

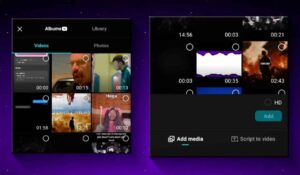
You will find a lot of Capcut New Basics Editing Tutorial 2026, but it may take a long time to understand them, or you may just have to watch boring screen recordings of Editing. That is why I started this series, so that you can understand editing from the very beginning in an easy and detailed way. Now, you will learn the tools and basics of Capcut that will be useful in our next Editing Story episodes, so that those who are just starting out will not have any problems later. And let me make it clear, this is not a separate series. This is to highlight editing as a must-have. Because if you want to be a good mobile editor who can edit any kind of video, be it documentary editing or advanced 3D editing, these two apps are essential to becoming a professional editor. And if you understand Capcut New Basics Editing Tutorial 2026, then clear your throat and join it. And yes, I am using Proton VPN. Because Capcut pro version does not work in India without Vpn. So, after launching it, come to PC. As soon as it opens, skip everything and jump straight into the new video. Now, import all your media. Next, just click on the Add button and your sleek interface will be ready. There you will find three sections: Preview, Timeline, and Tools. But before you start, set the resolution to avoid formatting issues later. For this, you need to go to the last section of Tools, where you will find the Aspect Ratio.
Capcut New Basics Editing Tutorial 2026
This section basically selects the resolution of the imported media. But you can change this ratio as per your preference, be it for YouTube, Reels, Instagram, or any other platform. And if you choose a ratio that does not suit your video and the rest of the background looks black, then you can change it. For this, you will also find the Background option along with the Aspect Ratio option. Here, you can select the color of your choice. Otherwise, you can use the Image option to set any image. And here you will also find a few backgrounds. Another cool feature is the blur option, which enlarges and blurs your video, which looks great. You can also adjust the amount of blur to your liking. And yes, this only applies to this layer. The ‘Apply to All’ option applies to all layers. But for now, I just want to keep the YouTube aspect ratio. I’ll keep that. But if I want to remove a part of a scene, go to where you want to cut. Select the layer, or click directly on the layer, or click ‘Edit’. Now, there will be a trimming option on the left and right side of the layer you selected. If you hold it and move it in the opposite direction, that part will start trimming. If you can’t trim it properly with it, move your playhead directly to where you want to cut the scene. Then you will see the “Split” option there. Click on it, and it will split into two scenes, that is, two layers. So, you can select the first layer and delete it. Suppose you want to cut a scene from the middle, just select the layer and move your playhead to where you want to trim, click “Split” on both sides and delete the middle part. That’s it. Imagine this. You’re editing on your mobile phone. In the middle, you accidentally delete a layer. You get angry and break your phone. I mean, anything can happen. Now it will come back. I can’t say anything about that. But the layer that you created again while editing, it can definitely come back. Just click “Undo” and that scene will come back. And click “Redo” and it will go back to the previous state. That means you’re back to the previous state. Got it [Music]. Now look, it was just a layer. If you want to add an overlay, there’s a section called Overlays. You’ll find Overlays under Tools. Then, click Add Overlay and select your media.
Now, the layer you just imported will be on top of it. If you hold down this overlay and move it left or right, it will move according to the timeline. The track of this layer is the main track. If you hold down any layer on the main track, you will see all the layers and you can arrange them in the order you want. Now, if you select the overlay and click on the splice option, you will be able to change its blending filters, which will allow you to combine this image with the original image. And in addition to splice, you will also get the animation option, which will allow you to add in-out and combo animations. Capcut New Basics Editing Tutorial 2026 has Premiere Effects, but you can’t customize them. So, you have to choose which ones you want to use. You can also select your own outs and combos. The combos look a lot like this, right? Now let’s speed things up a bit. I’m going to lower its opacity a little bit. You’ll find it in the Layer Selection Tools. It’s also known as Transparency, but that’s what opacity is. Now, let’s go to the Effects tab. If you go to Video Effects, you’ll see transitions, shakes, overlays, animations, and many other types of effects. Let’s say I want to apply a glow-in-the-dark effect. Just click here, and it’ll be applied. And I can also adjust it by going to Adjust. Now, if I want to cut the Discord icon in half, that is, cut it in half. There’s a Crop button here. You can adjust its size with that. There’s also a Resolution option here. So, adjust it as needed. Now, if you’re working on a layer that you want to create another screen with, just click Duplicate here. It’ll be duplicated. And if for some reason you have created such an animation on an object. But you want to change its scene, replace it, then click on Replace here. And select the object that you want to replace with. For example, I will select the potato. Our potato is burning beautifully. Here, brother, you eat it too. Now let’s come to sound designing. And yes, let me clarify one more thing for you. These timeline tools are a different thing. If you select a layer, then its tools are different. So now we have to use the timeline tools. Here you will find a separate section for audio. If you select it, then all your audio will be shown to you. Now I will explain the matter with an example. Do this. Now if you have a video and you want automatic captions in it, then first I delete all these and adjust its volume again. Now you will find the option of auto captions right here in the text section. Just click on generate. Now it will automatically add captions for you. Yes, it will do it in Hindi too. Now if you want to add animations or effects etc. to it, then from here you can easily choose the template.
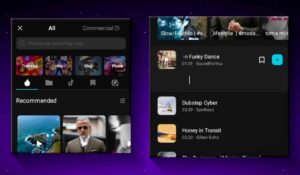
For example, I want to add some music. So I’ll click on Sounds. There’s a lot of music in Capcut New version. But who knows, there might be copyright issues, so be careful. Click on the File icon. Then go to Devices. Here you’ll find all the music saved on your device. Choose your favorite music, play it, and add it. And if you click on the Extract button, you can import music directly from your videos. Like, the audio is imported directly, not the video. And if you go further, you’ll find a separate option for Sound Effects. And it has a lot of sound effects. That should do the trick. But if that doesn’t work, I’ve already added a bunch of sound effects to Telegram. Yes, to be clear, it’s free. If you want to add a voiceover, there’s a record button. And if you ever forget, there’s a teleprompter. Well, click on that and paste your script here. Then tap or hold the record button to continue your voice-over. Yes, once the recording is done, you can remove noise from it from here. And if you want, you can make your voice sound better. I mean, from here you can. You can improve it. Yes, there’s one more thing: text to speech. If you don’t have to speak at all, you just type text and it will convert it to voice. For that, I set the volume of this scene to zero. And now I click on text to speech and type what I want to make into voice. Now, there are a lot of characters down here. Go to View More and you’ll find more characters. You’re right. But, it looks good. Let’s apply it. You’re right. Now if you go to edit this voice, that is, you want to remove any extra noise etc., but it won’t because this voice and text are combined on one layer, so you select the layer and go to Tools, there’s an option to separate, separate it and your audio will come out.
Now let’s look at the audio tools. Here you will find a fade-in feature (music). If you increase its value, the more seconds you increase, the faster the sound will fade-in. Exactly. Now, with these audio effects, you can change its filters and properties. “Gam, right, right,” sounds amazing. Now, if you go further, you will find a speed option with which you can control the speed of this voice. How fast, how slow. If I slow down the speed, it will sound like Godzilla. Now that’s it. Now let’s move on to the text. Here, I will click on “Add Text” and type my text. If you don’t want something too complicated, there are many presets for text in the template section. You can use them. If you want to create your own, first choose your font. Like me, I can use any font. There are a lot of fonts here. Then, go to the style section. As soon as you get there, you will see a few presets for text. You can apply these. Alternatively, you can create your own. Below, you can control the color, size, and opacity of this text. If you want, you can use the color picker to choose any color from your screen. But I’ll leave it at that. Now, let’s talk about the stroke. It’s basically an outline around the text. You can change its color to your liking and control its width. I’ll keep it at 15. Now, let’s talk about the glow. It basically adds a glow to your text. You’ll find two types of glow here: a normal glow and an angel glow. What is this angel glow? It’s basically a glow that radiates outward. The normal glow is usually suitable for most applications. Now, you can customize it. Now, let’s talk about the background. This will create a background behind your text. So that your text can be seen clearly. And you can also adjust its controls to your liking. Next comes your shadow. You already know what it is. It appears behind the text here. So that the text is clearly visible. Here too, you get all the controls. With curve, you can curve your text. With spacing, you can increase or decrease the space between the letters. With bold italic, you can make your text bold or curved. With case, you can write your text in uppercase or lowercase. If you don’t want to do that either, you can find other presets in the Effects tab. Now let’s talk about animations. Here you will find all the animations for the text: in, out, and loop. Choose a premium animation of your choice and go to apply styles, where you will find many templates. Choose any one of them. Now, our nice captions are applied. If something is written in the caption by mistake, you can correct it with Edit Caption. Now let’s move on to the effects. If you go to the Video Effects section of the Timeline Tools section and select any effect and apply it, it will appear as a separate effect layer. What we did earlier was select the video and apply the effect to it. That effect will only work on the video.
Capcut new
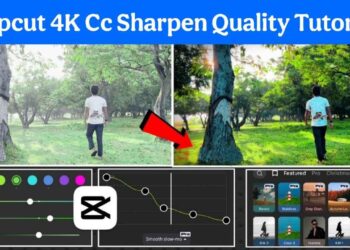
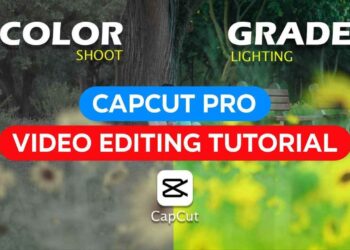
But it will work on all the layers below it. Another thing is body effects. To use this effectively, we must have a person in our scene. For example, if I apply an effect, it will be applied to the body of this person. Now let’s talk about filters. This is basically color grading. But in the filters you will find some presets. Like this 4K, this Before vs. After, there are many such presets. If you want to create your own preset, then go to Adjust. Here you can control the brightness, contrast, saturation, etc. according to your needs. And I find the color match feature very useful. Just click on it and select any scene in your timeline. And your scene will be color graded according to that scene. You can also select an image from the gallery if you want. Now, the adjustments that we have made here are made in the timeline tools. But if you want, you can also select the layer and change it in the filter. So it will be limited to the layer only. Now look, these are two different movie scenes. There’s a cut right in the middle. So, we can add transitions to them if we want. For that, you’ll see an icon like this between the two layers. Otherwise, just click on Split where you want the transition. Just click on it and you’ll see a bunch of transition presets. Now, pick any one and apply it. And if you have multiple scenes where you want the same transition, then click on ‘Apply to All.’ This will apply the transition to every cut scene. Now, let’s go back a little bit. For example, let’s say we upload this scene again. Oh, wait, I accidentally dragged it to the main menu. I should have put it in the overlay. But I can still do that. I’ll click directly on the layer. And there’s an overlay button there. Simply put, it’s in the overlay. And I’ll adjust it a little bit accordingly. Now, if I want to remove the background of this scene, I’ll see a ‘Remove Background’ tool. Just click on it and you’ll see an ‘Auto Removal’ button. Select it only if there are people in your scene. Now, this removes the background very well. I’ll show you in a little bit. This is done by reducing the opacity of the original layer. Check it out. And yes, I forgot to mention this. You can also improve the quality of the video by going to Adjust. You can also increase the optical flow or reduce the noise of the image. Now, let’s say I want to move some text, image or video behind this layer. That is, behind an embedded character. For example, I added this page. Now I want to put this page behind this layer. So how? If you go to Tools, you’ll find a Layers section. And from here, select Send to Back. So that your page goes behind that layer. Now, you can animate it however you want. For example, using keyframes. If you don’t know much about keyframes, I’ve tagged a video above. You can go and watch that. Keyframes define a start and an end point. And the software adds animation in between. For example, I put this angry page behind it. And then I added a keyframe. And then I went back a little bit and added another keyframe. Now, again, I’ll come back to that keyframe and move it out. And with this button, you can add keyframe graphs for smooth animation. Now, I’ll add any one. I even added a nice shake effect. So, this is what I created. If you want to remove the green screen from your scene, upload your footage and go to Tools. Remove Background and Chroma Key. Now, choose any color you want. It could be green, black, or something else. Whenever it appears in the image, it will be removed. And by increasing the intensity, you can remove more detail. Next comes camera tracking. This basically tracks your character’s head as you speak. For this, you can go to Tracking and click on Camera Tracking. And then click on Track and customize the face or whatever you want to select. And I’m going to create a box on its nose so that the camera tracks its nose Does..

Then just click on drag. And when you’re done, click on fit canvas. And that’s it. Smile. The next feature might be very useful for you. For example, if you’re making a facecam video but you don’t have a good backlight or for some other reason, you can use Relight. There are basically a number of options here. You can choose any one according to your convenience. Then, once it’s applied, you can customize it later. I’m choosing this option. And if you see a little adjustment icon above it, you can click on it and adjust it. So, basically, he’s put three lights here. And at the top, you’ll see a separate section for each light. There are basically two types of lights here: a point light that throws light in one direction. A directional light that throws light in one direction across the entire scene. Here, he’s created two directional lights and a point light for the face. Now what do we do? We’ll select our directional lights, go down and under “Objects” select “Both”, so that it lights both the background and the people. It’ll have a natural feel to it. Now, you can change the color or anything else you want, and it works pretty well. So, now we’re almost there. Okay, let’s create a new project. Let’s say I’ve inserted this Alight Motion page. Now, if I want to change its position, I can change it with my finger from the preview screen. But if I need to scale it, I can make it bigger or smaller with two fingers. And to rotate, I just tilt it. Now, I’m going to add a keyframe. And going forward, I’m going to make some changes to it. And in between these two, I’m going to add a keyframe graph. Any. If you don’t want to change it from the preview screen, there’s also a transform feature here, which allows you to change the positioning, scale, and rotation. Also, in the position value you will see the x-axis and the y-axis. Don’t get confused by these. The x-axis means left or right. The y-axis means up or down. Now, I need to add a graph to it as well.
And I will export it. And now I will create a new project. And I will upload this exported video here. So, this was the animation that we created earlier. If you want to reverse any of your videos, select the layer. Go ahead and you will see the reverse icon. Just click on it and your video will be reversed. Also, if at some point you have a small scene, you want to freeze it so that a different image appears. So, move your playhead there and click on freeze. A different image will appear. You will also get a motion blur option, which will make your video look smooth and natural. For those who don’t know what motion blur is, it is a bit like spinning a tire. When they rotate, a slight blur is created. If you use this in your project, keep the amount between 20-30. Now, go back to the project. There is an option here, and I will tell you about it, because it ruins a lot of your projects. For example, any text, audio or overlay is added here. Let’s add text. Now, this text is related to the original track. So, if this button is on, any text that is on top of our original layer will disappear immediately. But if you leave it off, it will have no connection to your original text. So, even if you delete it, the text will remain. Now, finally, how do you mask it? For example, I will add a background here, which you can also find in the library. To mask it, you need to go to Tools and click on Mask. Here, you will find different types of masking options. I will select Mirror for now. So you will see that this black background is masked with a striped line. Now, no matter how you move it, it will remain masked in that place. I’m going to invert this masking by clicking “Invert.” If you drag this arrow down, it will add a feather. That is, the sharp edges will be softened. Now, I’m going to adjust this masking to my liking. Now, if I add a keyframe to it, or back Let’s go ahead and hide it, if you don’t understand masking, don’t worry. The next editing section is all about masking. And yes, keyframes work on everything, be it effects, text or adjustments. So, in this video, you learned the basics of Capcut New Basics Editing Tutorial. Don’t worry if you don’t understand some things. You will understand everything in the advanced sections that come up. So, don’t worry. That’s right, if you haven’t watched Editing Master, here are the rest of the sections.


I am a video editor
NEW CAPCUT LİNK PLEASEEEEE!!!!!
Capcut error
Hi! Really impressed by the structure and presentation of your content. The design feels professional while still being easy for visitors to navigate.
I’d love to know which tools or framework you used because we’re also working on improving a similar resource for SRD beneficiaries here:
helpful SRD application & status checker
http://sassasrdstatuscheckdates.co.za/
Thanks for sharing such inspiring work and ideas 👍
Tuyachin
Lucky
Osvh cover 📔 the Sam I will be in a call 🤙 the Sam ko bhi nahi
Cap cut download nahin ho raha hai
Mujhe bhi bhai chahie alag cap Kaun
t78tlp
Sharpening 4K videos in Capcut is super useful for content creators. For those looking to add dynamic motion or atmosphere to their videos, tools like free photo to video ai can be a great next step after editing in Capcut.
Nice breakdown on sharpening 4K video in Capcut. If you want to enhance AI-generated visuals or experiment with different models, you could try free nano banana online for image and video creation alongside Capcut.
Me
Karan muniya
Nfhgvmcvbc
It t