
Hello everyone, how are you all? In today’s video I will show you how to apply 4K Cc Sharpen Quality to your normal video using a Capcut apk and convert your normal video into a high-quality video. So, don’t forget to watch the blog till the end. Let’s start the blog. Since we are going to apply 4K Cc Sharpen Quality using a Capcut apk, first you will need a working Capcut pro new apk and a VPN. So Vpn is required if you are Indian. You will find a lot of VPNs on the Play Store. You can install and open any of the Vpn from there. Then, connect to any of the servers. It doesn’t matter which server you are using. But, which Capcut pro apk you are using definitely matters. If your Capcut App is not working, then you will face problems. Okay? So, open capcut. An interface like this will come up, and you can see Telegram for capcut new version. You will see a “New Video” option here. Click on it. Then, select the video whose quality you want to improve and add it. For example, I have added a scene from a movie here. You can see its quality here. It is of very normal quality. You can say that it is quite good, that is, its quality is normal. Okay? Now, we will edit this video and convert it to a high quality video.
Capcut app download
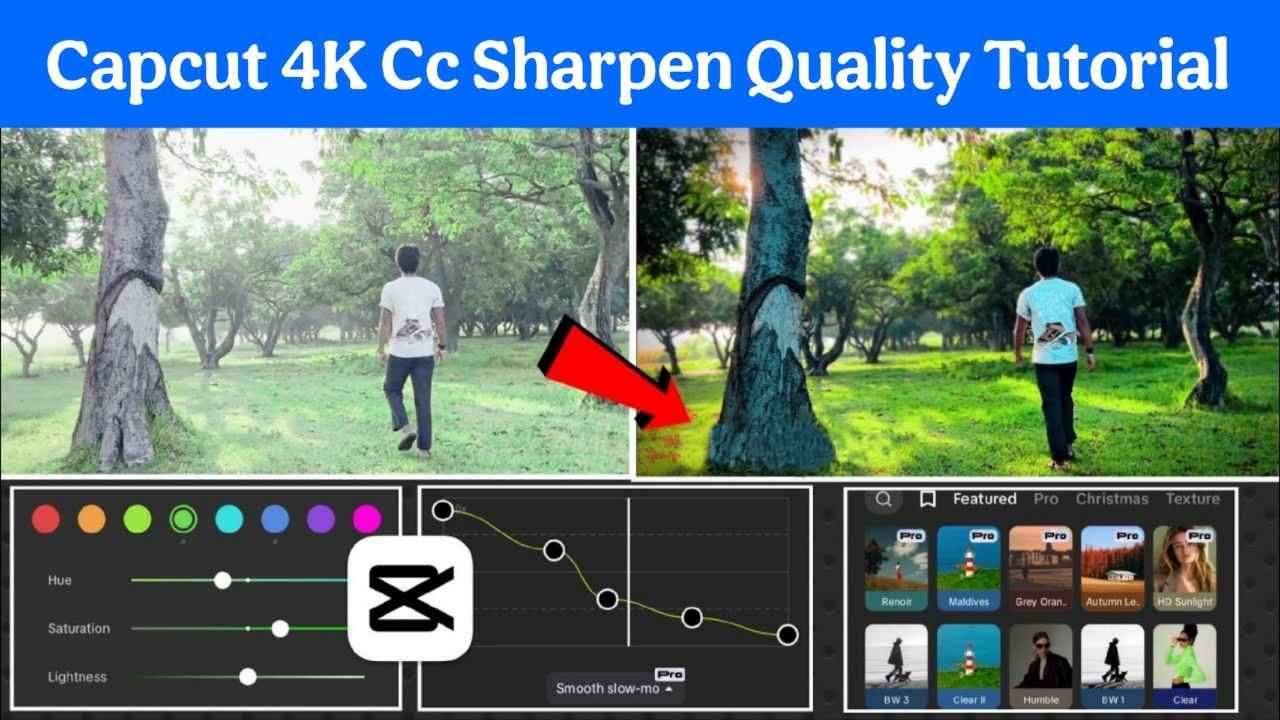
How to Sharpen Video 4k CC Quality with Capcut app
To convert it to a high quality video, we will apply CC to it. We will also make some adjustments. So, first, let’s make the adjustments, which are very important. Okay? So, first, you have to go to the filter option that is visible here. In it, there are so many good filters available to basically improve the quality that I don’t know what to say.

For example, you get Bokeh and 4K. If you apply both here, like you applied it first. Okay? And here, adjust it to your liking. Basically, what Bokeh does is it blurs the background nicely. Okay? So the subject is highlighted better. So you can apply that, or you can use 4K. 4K directly improves the quality of your video. You can do that with the notch here. Okay? Look, it has improved the colors etc. and sharpened the video. Okay? So you can apply that. Then, go down and you will see the Enhance option. You can use that. You will find a lot more here. You will find Vivid etc. Vivid really brings out the colors. Okay? So, you can use just two or three of these filters here. First, apply the 4K filter and hit Done. It is applied. Then, add another filter here. For example, add Bokeh or Enhance. Add Vivid. You can choose from the best filters available here. Okay? As you can see, this bright color looks pretty nice. So, let’s leave it and hit ‘Done’. See, we’ve only applied these two filters here. Okay? One is the 4K filter and the other is the Background Light FX. Okay? So, you can see that the colors have improved a lot. Okay? So, that’s it. Now, next you can make adjustments here. We haven’t applied CC yet. We will apply CC. Okay? First, let’s adjust [Music]. For that, click on the video here. Then scroll down a little bit. You’ll see an ‘Adjust’ option right here. Click on [Music]. Okay? You’ll find a lot of tools here. Like Brightness and Brilliance, which you can do some really cool things with. First, increase the Brightness here a little bit. Okay? Like, we’re increasing it here a little bit. Then, decrease the Brilliance a little bit. This will create a soft light in your video. So, you can say that the light will increase and it will not hurt your eyes too much.

For example, what happens is, if you increase the light too much, you’ll see that it’s burning your eyes. Right? That’s not what happens. That is, increase the brightness, and if you reduce the brightness that you see here a little bit [music], your light will be much more balanced. Right? Always use this technique. Then, you get sharpened. By increasing it, you’ll notice that the quality has improved significantly. Similarly, Capcut app
By increasing the clarity, you’ll notice a huge difference Okay? So, it’s a simple thing, you just have to increase these two. By increasing these, we get a lot better quality here. Okay, so you can see that just by doing this, it’s pretty impressive. Now, if you want to increase the coloring a little bit. For example, you can increase or decrease the saturation to your liking. I’ll increase it a little bit here. So, what this does is, it starts to look like a movie, like a movie reel edit. Okay? Okay? Like, if you look here, it looks like a movie reel edit, that is, it’s a video. Okay? So, the more you increase the saturation, the better it looks. [music] Okay? So, you can do that. I mean, you can increase the saturation. Also, you can do both blue toning and yellow toning with this temperature here. I would suggest moving the yellow side a little bit. It gives you that 4K vibe that you get from a movie reel edit. Okay? So, you just increase it here. Okay? By doing that, you can see it here. It’s pretty cool. Now, adjust the brightness here a little bit, because it looks a little bit low. The saturation looks a little bit high. Okay? And I want to move the temperature here a little bit. It looks a lot better on the blue side. Okay? Then, there’s also a black and white option here, which you can adjust or reduce the brightness here to make it even better. I mean, look, this look is all achieved with these. Okay? You won’t notice much difference from CC. CC is nothing compared to the good results that you get by adjusting the colors and so on. You can see it’s amazing. Okay? Now, when we finish this, you’ll notice it. Our video looks like this, your work is done here. You can see it It’s much better quality. Capcut app

We’ve increased the sharpening and other things. It’s great. Now, to take it to the next level, you need to apply CC here. For that, you’ll see the Effects option. Go up there, go to Video Fit, and search for HDR directly. Right? If you search for HDR, you’ll see a lot of HDR. And that’s how CC is applied using HDR. For example, HDR2 looks pretty good based on the environment. Then, you’ll find the HDR option here. You can use that. You can use that. If you go down, you’ll find a lot more HDR. I personally had a color here, which I couldn’t see even after searching here. Right? So, I went back here and it’s supposed to be in the Motion section. And why is this error happening? Hold on, just refresh. Maybe our VPA isn’t working properly there. Actually, what happens is, if you ever open Capcut and apply VPA, it won’t work. Right? But yeah, it works later. Right, you can see it’s working. Okay? And here, this HDR from I Think Motion, yeah, this Smart Sharpen [Music], that I was talking about. Okay? After applying it, you just need to make a little adjustment here. Look, this is Smart Sharpen. It’s going to take a little adjustment. But it’s going to make the video look really great. Take it up to Adjust. And here, first, reduce this filter and reduce the blur as well. Okay? Do those two things. Okay? Let’s keep it a little blurry. It looks good. And the range and the sharpen, these are the two most important things. Range and sharpen. So here, increase the range to your comfort level. Increase the sharpening to your comfort level. For example, see, the more you increase it, the more sharpening it will apply. Okay? But not too much. So, let’s keep it around this amount. And here we’re keeping the range around this amount. Then let’s try it. Okay? Does it look good or not? It looks a little too sharp. Doesn’t it? So, let’s tone it down a little. Okay? Now I’m going to fix it this way and consider it finished.

Then, apply it to the entire video. That’s what you’ll notice here. So much like this, your normal video has been transformed here. You can notice here that the quality of our video has improved significantly. Okay? You can see that. Okay? And the filters and so on that we used here, like all these filters. Okay? That was our result. If you wanted to add more filters here, like there was a clear type filter here. Okay? Look, this clear filter will enhance the glow of [the music] and make it look better. I mean, there are so many [music] things that you can apply and literally make your video look so beautiful. For example, I’m applying this [music] here and I’m done. Okay? So, look here, how great our video turned out. Let me show you the previous part. So you can clearly understand the difference. Okay? Notice this here. Before, it was a little bit crappy. Okay? But when we edited it, after the editing, you can already notice how high quality it became. Okay? So this is how the low quality is converted to high quality. With filters, adjustments and effects. Now, to save it, you will see this option here. Click on it. Maximize everything. Okay? Maximize everything completely. Then click on Export and then click on Save to Device. Your video will be saved to your device. And let me tell you a little trick. If you ever want to enhance the quality of a video, what do you do? There are some applications. For example, you get Air Video. You can enhance the quality of your video in it. Then, you get a Wing Kit here. You can do that in it too. Okay? So, what all this does is improve the quality of your video. So that’s it for this blog; see you in the next blog. Until then, be happy and keep spreading the joy.


Capcut pro